Silhouette: Smallbore
Smallbore matches are held on Sundays 1000 – 1300hrs April through October.
Current Match dates for 2024 are:
April 14
May 12
Jun 11
Jul 23
Aug 25
Sept 8
Oct 27
Setup at 0900 with a 1000 start.
New shooters: 1st match is free. 15 years and under matches are ½ price.
If you have any question after reading below please contact match director.
This page introduces the sport of silhouette shooting at Factoryville Sportsmen’s Club. It covers the following subjects:
- Introduction (essentials of the game)
- Equipment (rifles, scopes, ammunition)
- Getting Ready (testing ammo, getting your scope settings)
- Shooting Offhand (how to stand and hold the rifle)
- The Match (what to expect at your first match)
- Awards (what you can win)
- Downloadable Targets (PDF files of smallbore silhouettes)
Read the subjects that interest you, but don’t stop there: Come on out and shoot! Words and pictures can’t convey the fun of the real experience!
Introduction
A silhouette is a steel profile of an animal (chicken, pig, turkey, or ram) standing on a pedestal. The object of the game is to knock as many silhouettes as possible off their pedestals, shooting one round at each silhouette. It is a very simple competition, with very simple scoring: You get a 1 for knocking an animal off its stand, a 0 for anything else. Although silhouette is an easy game to learn, it is not an easy game to master. The animals are rather small and the distances are rather large; you must shoot offhand (standing); a moderate breeze can move a bullet or a pellet the width of an animal; your concentration becomes more difficult to hold as you knock down five in a row. These factors make silhouette an endless challenge.
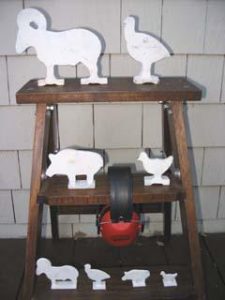
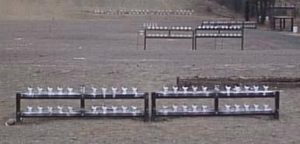
This photograph shows smallbore animals (top two rungs) and air rifle animals below.
Silhouette shooting originated in Mexico in the late 1940s, when several local shooters began friendly competition (bet you can’t hit that sort of thing) against each other at full sized targets simulation common livestock found on each other farms. It is now shot all over the world with everything from air pistols to black powder rifles. Silhouette sizes and distances vary according to the kind of rifle or pistol, but everything else is the same. For example, high-power rifle silhouettes are life-size, but they are shot at much longer distances than the scaled-down smallbore or air rifle silhouettes. Commands to load, fire, and cease fire are often given in Spanish, in part to honor the sport’s heritage, and in part to distinguish the silhouette shooters’ commands from those directed at other shooters sharing the range. (Non-Spanish speakers, don’t worry; there are only three commands!)
Our match consists of 40 (or 60) shots at the same number of animals. In a 40-shot match, you shoot 10 rounds at 10 chickens, 10 rounds at 10 pigs, and the same for turkeys and rams. The animals are 40, 60, 77, and 100 meters distant; You shoot at the silhouettes in sets (banks) of five; you get 2-1/2 minutes per bank, which is usually plenty of time even for single-shot rifles. In a 60-shot match, there are three banks per animal (3×5=15, 15×4=60); 40 shot matches have two and four banks per animal, respectively. In a 60-shot match, a few shooters will score in the 20s, most will shoot in the 30s and 40s, and a few will break 50. Perfect scores are very rare. Shooters are classified into handicap groups based on past performance so they can compete with others of similar ability. But it’s not just the score that counts. Shooters who never break 40 come to match after match because toppling a silhouette is a satisfying experience that you want to do again, and because silhouette shooters are a great bunch of people to shoot and talk and laugh with.
Equipment
One of the appeals of silhouette shooting is the gear: There isn’t much of it, and you can choose how much money to spend on it. A good-quality off-the-shelf hunting rifle will get you into the game, enabling you to acquire the fundamental skills of offhand shooting; it will shoot good scores if you do your part. If, later, you want to compete at the top level of the game, you can buy a fine-quality rifle.
Rifles
For smallbore silhouette, you can use most any .22 rifle and standard velocity ammunition. (High velocity ammunition is prohibited because it can damage the targets.) In practice, most people shoot bolt-action rifles with scopes of 16-24 power. However, there is no reason you should not come out with your semi-automatic and 8-power scope, or even iron sights if you can holdover at four different ranges. You’ll see how much fun the game is, what the people are like, and what rifles and scopes the veteran shooters are using. If you ask politely, you’ll probably be able to shoot any rifle that’s there.
To get a little more technical, there are two smallbore rifle classes (for details here a link for the NRA Rifle Silhouette Rules from the NRA):
Hunter class: A hunting-style rifle, maximum weight 8-1/2 lbs. including scope and empty magazine, minimum trigger pull 2 lbs. Popular choices include (in order of increasing price) NS-522, CZ 452, Sako Finnfire, Anschutz 1710D, plus all sorts of Rugers, Savages, Remingtons, Winchesters, Kimbers, etc.
Silhouette class: Typically, a purpose-built silhouette rifle, maximum weight 10 lbs. 2 oz. including scope and empty magazine. The most popular choices are Anschutz 54.18 MSR (metallic silhouette repeater) and custom rifles built on Anschutz or Remington actions.
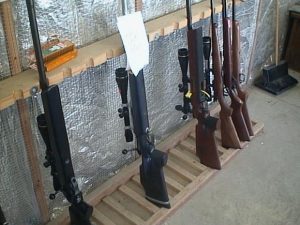
Smallbore rifles: three Silhouette-class rifles on the left; three Hunter-class rifles on the right.
Note: In between banks/rounds and matches you will need to place firearms in the rifle ranks. This means hands off firearms, the muzzle pointing up in ranks, the breech open, the chamber empty (if available chamber flags in), and the magazine removed.
Scopes
Most people need a scope to shoot silhouette well because the animals are small and there are four distances to shoot at: 9 to 24 power is adequate. Scopes are not required but recommended. Beginners will want to start with a lower power because it makes your wobble (motion of the cross hairs across the target) less apparent and therefore less unnerving. Look for these features in a scope:
Adjustable objective: You are shooting at four distances, so you want to be able to focus the scope at each distance. Repeatability: When you change the scope elevation from rams to chickens, you want to be confident that when you do your job right, the bullet hits the center of a chicken, rather than flying over or under it. You can check repeatability by shooting a “box” on a calm day
Resting the rifle for maximum accuracy, shoot five shots at a bull.
Raise the elevation one revolution; shoot five more rounds at the same bull.
Move the windage one revolution right; shoot five more rounds at the same bull.
Lower the elevation one revolution (to your original elevation); shoot five rounds at the same bull.
Finally, move the windage one revolution left, and shoot a final five rounds at the same bull.
If the last five rounds hit the same spot as the first five, your scope’s repeatability is good.
Target turrets: You need turrets that are easy to turn with your fingers and are clearly marked. Scopes that have micrometer-style rotation marks (1st revolution, 2nd revolution, etc.) help you see at a glance where the scope is set. 1/4 minute of windage or elevation change per click is good; 1/8-minute clicks will have you turning the turrets more between animals but still works OK.
Dot or fine duplex or reticle: Light conditions are almost always good, so you won’t have trouble seeing the reticle. In fact, a bold reticle can be distracting. More good shooters probably use the target dot (or the Leupold dot, which has tapered crosshairs) than the duplex; but they could all shoot good scores with a duplex. If you start with a duplex, you can sometimes have the reticle changed to a target dot for $50-$100.
Variable power (zoom): With a variable power scope, you can increase the magnification as your hold improves — and decrease it when it’s windy or you are having a bad day.
Reasonable weight: In some classes, especially smallbore Hunter, the weight limit may force you to use a lightweight scope if your rifle is on the heavy side.
Popular scope brands include:
Inexpensive: Bushnell Trophy, BSA, Tasco, Swift
Moderate: Weaver V16, Bushnell Elite 4200 8-24, Sightron SII 624x42D (all available with dot reticle)
Expensive: Leupold 6.5-20 EFR (available with dot reticle)
Ammunition
Ammo is highly individualistic about ammunition. Even two rifles with consecutive serial numbers may not shoot the same ammo well. However, some .22 brands seem to work well in many rifles:
Inexpensive: Federal 711B, PMC Scoremaster, CCI Standard, Wolf Match Target
Moderate: RWS Target Rifle, Federal 900B, Lapua Master L
Expensive: Federal Ultra Match B, Eley Tenex, Lapua Midas
Note: If you are shooting a .22 semi-automatic, you may need to install a weaker recoil spring to get the action to cycle reliably with standard-velocity rounds. Many stock semi-automatics have recoil springs that need the extra power of high-velocity ammo (illegal for silhouette) to operate without jamming.
Other Gear
You must wear eye and ear protection. Here are some additional items you may find useful:
Three or four magazines: so, you don’t have to reload between banks
Hiking boots: provide a stable and comfortable platform
Pen or pencil and 6″ x 9″ clipboard: for scoring
Countdown timer: to see how much of the 2-1/2-minute shooting period remains
Shooting vest: the one article of special clothing permitted by the rules; the pockets are handy for holding your gear
Getting Ready
If you want to have a good time at your first silhouette match, you should do three things in advance:
1. If you are not a member, join the NRA, which is the governing body for silhouette shooting. (However, you can shoot one unofficial match if you are not yet an NRA member.)
2. Find out which ammunition your rifle shoots most accurately and is consistent with your budget.
3. Establish your scope elevation and focus settings for the silhouette distances:
Smallbore: 40, 60, 77, 100 meters
|
Smallbore conversion |
||
| Meters | Yards | Feet |
| 40 | 43.745 | 131.23 |
| 60 | 65.617 | 196.85 |
| 77 | 84.208 | 252.62 |
| 100 | 109.36 | 328.08 |
Testing Ammunition
To test ammo and determine your scope settings, you need the calmest possible weather. Even slight breezes will displace a bullet, an inch at 50 yards, making it impossible to know whether your rifle doesn’t like the ammo, or the wind is pushing it around. Early morning and evening are the best times to test, at least in summer.
To test ammo, set up a multiple-bull target at 50 yards. Choose bullseye targets that are easy to center in your scope; most people can see white rings easier than black ones; some people prefer to align the crosshairs on grid intersections. (If you have Adobe Acrobat Reader, you can download this sample target below.) Rest your rifle on blocks and sandbags (or on a rifle rest if you have one) to maximize your steadiness. Shoot one five-shot group per bull, holding the rifle as consistently as possible across the shots. Five groups should give you a good idea of an ammunition’s performance in your rifle. After changing to a different brand, the first group you shoot with the new ammo may be comparatively poor; if it is, ignore it. If your rifle will consistently shoot 1/2″ groups (measured center-to-center, or edge-to-edge and subtracting one caliber diameter) you’ve found an ammo your rifle likes. But 1″ groups are OK if they are consistent. When you’ve got the right ammo, you can be confident that the animals you miss are your fault, not your equipment’s. That’s important for observing and correcting your mistakes and also for concentrating on the fundamentals when you shoot. If you want to test .22 ammo more meticulously, test the ammo that groups best at 50 at 100 yards to find out which is really best. Note that 100 yard testing requires dead calm conditions and good bench rest shooting skills.
Getting Scope Settings
Once you’ve selected an ammunition, you need to get your scope settings for that ammo. With known settings, you’ll be able to quickly adjust the scope as you change from chickens to pigs, pigs to turkeys, and so on. To determine scope settings: staple a multi-bull target to a cardboard box and position the box on the range at the distance of one animal. Ballast the box with rocks or gravel so the wind doesn’t blow it away (though for best results there shouldn’t be any wind).
Apply a piece of tape to your stock or scope tube and mark your four elevation and windage settings on it. Use tape or adhesive dots to mark the four focus points on the scope bell so you can easily change distances. NOTE: Don’t assume your scope settings are exactly right. Every time you shoot, you hold the rifle a little differently and therefore change the point of impact. Some scopes are affected by temperature variations. Always arrive early at a match so you can check your settings and adjust them to the current conditions.
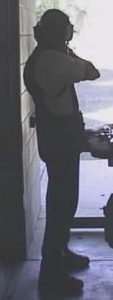
Shooting Offhand
You shoot silhouette from the offhand position. This means that you shoot standing and you support the rifle entirely with your body. No part of your body except your feet can touch anything. You cannot wear stiffening shoes or clothing. Silhouette’s roots are in hunting and becoming a better silhouette shooter can make you shoot better in the field as well.
Note: there’s a special “varmint” class that shoots sitting, with the rifle rested on sandbags. This is a great way for beginners to get acquainted with the game; if your rifle is set up properly, you will definitely knock over a bunch of animals from this position.
You can shoot offhand hunter-style, with your support hand forward and cupping the forend However, you will notice that most good shooters use a target shooting position:
The support elbow is held against the side of the chest, ideally resting on the top of the pelvis (even with the navel).
The forearm is nearly vertical.
The forend is supported only from the bottom, with knuckles or splayed fingers (depending on how high you need to raise the rifle to see through the scope with your head erect).
 |
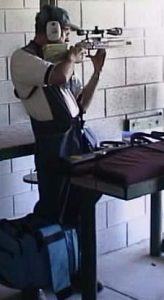 |
Offhand position: rear view side view
The above photos show Tim Kurreck, member and national champion. The idea of this stance, which will probably seem very odd and uncomfortable at first, is to make the support side of your body like a post on which the rifle rests. The post is composed of bones, not muscle, because bones are much steadier. To make the support side of your body like a post, thrust your hip toward the target and try to plant your support elbow on the pelvis (above your hip joint and even with your navel). If you’re doing it right, the support side of your body will be relaxed and you will feel the weight of the rifle on your pelvis. To aim, use the large muscles of your midsection, not the small muscles of your arm or shoulder. Note: not everyone’s body proportions permit resting the elbow on the pelvis; if your elbow doesn’t reach that low, hold it and your upper arm firmly against the side of your chest.
The Match
Here’s what to expect in your first silhouette match at Factoryville Sportsmen’s Club. When you arrive between 0900 and 0945, you’ll help set up the targets, sign in for the match and at the range, choose the animal you want to start with (pigs are easiest, turkeys are hardest), pay an entry fee, and then practice for half an hour or so. Cost is $5 per rifle plus a NRA yearly fee of $12 for your NRA score rating card. Use the practice time to verify or adjust your sight settings, then shoot some animals to warm up and get accustomed to the conditions. There are small bore matches a day usually starts around 1000 and 1100 and ends between 12-1.
Shooters divide themselves into relays that shoot together. Our relay is up to 12 shooters; three for chickens, three for pigs, and so on. Depending on the number of shooters, there may be two relays called relay 1 and relay 2. At some point, the match director (technically the Chief Range Officer) will call your relay to the line. Carry your rifle (unloaded, breech open, muzzle up) to the shooting station for your animal; signs above the stations denote “pig 1”, “pig 2” “pig 3”, and so on. Lay your empty rifle on the bench or rack with the open breech visible and the muzzle pointing up. If you have magazines, load two with five rounds each. Arrange your magazines, ammo, scoresheet, pen, and timer on the bench so they are easy to see and reach. Then stand a few inches from the shooting bench.
The match director will soon announce “Listo”, which is Spanish for “Ready”. Start your timer. Load a magazine or a round. Check that your scope focus and elevation are correct for the animal you are shooting. Begin aiming at the leftmost animal in your first bank of targets. Be sure you are aiming at your chickens, not at those of the shooter next to you–hitting the wrong animal is a miss! Each set of banks is marked with a letter “A”, “B” or “C”, that corresponds to your shooting station.
After 15 seconds, the match director will announce “Fuego”, which is Spanish for “Fire”. Shoot the leftmost animal in your bank. Whether you hit or miss, the next round goes to the next animal to the right–you get five rounds for five animals, period. When you finish, lay your rifle on the bench, unloaded, breech open, and muzzle pointing downrange.
After two minutes and 45 seconds, the match director will announce “Alto Fuego”, which is Spanish for “Cease Fire”. Do not fire again. Even if you have not taken five shots, make your rifle safe and lay it on the table. Record your score, marking an X for a hit, a 0 for a miss.
After a short break about two minutes, the match director will repeat the Listo-Fuego-Alto Fuego sequence for the next bank. When your relay has completed its banks, the match director will arrange for the entire range to cease fire, and you will go downrange to reset the animals you have shot in preparation for the next relay. Take a can of white paint with you and spray over your hits so the next shooter has clean targets.
When all relays have shot, you will be called to your next animal. Although you may start with any animal, the progression is always chickens->pigs->turkeys->rams->chickens. Before leaving one animal, set your scope up for the next one, so you don’t forget.
Occasionally, for various reasons, you may not have five animals to shoot at. In such a case, you make your final shot at an animal left standing in a prior bank. It should be one of your animals unless there are none, in which case it can be one of your relay partner’s animals. Before shooting an animal in another bank, let your partner know which you intend to hit, and ask for permission if you must shoot at one of your partner’s animals.
When the match is over, total your score and transfer it to the sheet maintained by the match director. After scores are announced, the range may remain open for practice or a shoot off if there’s a tie. When the match is finished, help gather the targets, put away the target stands, and begin thinking about how you’re going to shoot better next time.
Awards
Targets that are hit 5 or 10 in a row are a special occasion, and have pins awarded for that achievement. 10 in a row on each animal are documented with the NRA over a shooters silhouette “career” in order to get what is the golden grail of silhouette known as a Grand Slam joining an elite group of shooters.
Downloadable Targets and information
Click the links below to download PDF outlines of the smallbore silhouette targets. These targets include a one-inch ruler. Measure it after printing to verify that your printer is set up right.
| Attachment | Size |
| GroupTargetTest.pdf | 3.57 KB |
| Silhouette_4Targets.pdf | 1.73 MB |
| Schedule_Card_2022.pdf | 86 KB |
| NRA Rifle Silhouette Rules booklet | 2.2 MB |